2015年3月16日 星期一
html遇到的奇怪雜症
1:
若是改為
Document.getElementById("IDSessionKey").value = sessionKey;
會發現value依然為123456. 猜測應該是這兩個的執行順序不同.
答案發現了
document.getElementById('IDSessionKey').value = sessionKey; //<---ok
耍笨.

2015年2月16日 星期一
html cookie 讀/寫/刪掉
function writeCookie(title,value,days)
{
var expires = "";
if(days)
{
var date = new Date();
date.setTime(date.getTime() + (days*24*60*60*1000));
expires = ";expires=" + date.toGMTString();
}
document.cookie = title + "=" + value + expires + "; path = /";
}
function readCookie(title)
{
var name = title + "=";
var ca = document.cookie.split(';');
for(var i=0; i<ca.length; i++) {
var c = ca[i];
while (c.charAt(0)==' ') c = c.substring(1);
if (c.indexOf(name) == 0) alert( c.substring(name.length,c.length));
}
return "";
}
function delCookie(title)
{
writeCookie(title,"",-1);
}
code:
https://drive.google.com/file/d/0B8hm-I2M8BD7TmlmcE44bENNN2M/view?usp=sharing
請放在C:\Program Files\Apache Software Foundation\Apache2.2\htdocs
{
var expires = "";
if(days)
{
var date = new Date();
date.setTime(date.getTime() + (days*24*60*60*1000));
expires = ";expires=" + date.toGMTString();
}
document.cookie = title + "=" + value + expires + "; path = /";
}
function readCookie(title)
{
var name = title + "=";
var ca = document.cookie.split(';');
for(var i=0; i<ca.length; i++) {
var c = ca[i];
while (c.charAt(0)==' ') c = c.substring(1);
if (c.indexOf(name) == 0) alert( c.substring(name.length,c.length));
}
return "";
}
function delCookie(title)
{
writeCookie(title,"",-1);
}
code:
https://drive.google.com/file/d/0B8hm-I2M8BD7TmlmcE44bENNN2M/view?usp=sharing
請放在C:\Program Files\Apache Software Foundation\Apache2.2\htdocs
2015年2月15日 星期日
javascript 隨手記
1:
browser的寬高
document.body.clientHeight
document.body.clientWidth
2:
<body onload="resizeImg();" onresize="resizeImg();">
3:navigator.cookieEnable. 查詢cookie
4: window.onload = function(){}; 直接在script使用.不用在<body>
5:
<input id="zipcode" name="zipcode" type="text" onclick="showIt(this.form)" />
function showit(theform)
{
alert(theform["zipcode"].value);
}
6:onfocus , onblur , onchange.
onblur跟onchange差別為在切換不同元件即觸發. onchange必須加上數值更動的條件
7:isNanN(inputField.value)
8:
function place(form)
{
form.submit();
}
<intput type="button" value="haha" onlick="place(this.form)">
9:正規表示
. 匹配所有字符,換行符號除外
\d 所有數字
\w 所有數字字母
\s 空格
^ 模式開始
$ 模式結束
/^\d/ 字串開始需要有1各數字
/cat$/ cat作為結尾
/^cat/ cat作為開頭
* 限制符前的子模式0或多次
+ 1或多次
? 0或1次
{n} {min,max} 需出現n次
() 集合字符或/和原字符 , 成為子模式.
var rule=/^\d{5}$/;
if(!rule.test(inputField.value))
/(red | blue) pill/
10:
/d[iu]g/ "dig" "dug" 是ok的
/\$\d[\d\.]*/ "$3.50" "$19.95" 是ok的
11: email 驗證
/^[\w\.-_\+]+@[\w-]+(\.\w{2,3})+$/
12:
getElementByID
getElementByTagName("div")
getElementByTagName("div")[3]
13:
nodeValue nodeType childNodes firstChild lastChild
document.getElementById("haha").nodeValue
document.getElementByTagName("body")[0].childNodes[1].lastChild
var node=document.getElementById("haha");
while(node.firstChild)
node.removeChild(node.firstChild);
node.appendChild(document.createTextNode("Ok,maybe you are alond."));
14:
span div 差異. 都是作為段落的區隔 , 但是div 有換行. div類似大括弧 , span類似大括弧內的小括弧.
15:
<span id="haha1" class="haha">haha</span>
document.getElementById("haha").className
16:
onmouseover: 進入button,
onmouseout: 離開button.
17:
document.getElementById("haha").style.visibility = "visible"; //visible or hidden
18:
<form action=/haha/haha method=POST name="setconfig">
<input type="hidden" name="session_key" id="IDSessionKey" value="123456">
<script>
var sessionKey = <% getCurSessionKey();%>;
document.wlanSetup.elements["session_key"].value=sessionKey;
</script>
</form>
19: 二維陣列
var seats = new Array(new Array(9),new Array(9),new Array(9));
20.
<input type="button" value="Order Banner" onclick="placeOrder(this.form);" />
function placeOrder(form) {
if (validateNonEmpty(form["message"], form["message_help"]) && <---對應form的name
}
21:事件
onforcus , onblur/onchange(移至下一個目標 ,差異為onchange內容被改時觸發)
22:動態修改網頁
var history = document.getElementById("history");
if (curScene != 0) {
// Add the latest decision to the history
var decisionElem = document.createElement("p");
decisionElem.appendChild(document.createTextNode("Decision " + decision + " -> Scene " + curScene + " : " + message));
history.appendChild(decisionElem);
}
23:
var now = new Date();
var between = (time2 - time1)/1000*60*60*24
return Math.round(between) ; #四捨五入
24:
new Blog("Got the new cube I ordered. It's a real pearl.", new Date("08/14/2008")),
function Blog(body, date) {
// Assign the properties
this.body = body;
this.date = date;
}
25: 函數自定義
var num = [2,4,1];
function compare(){
return x-y;
}
num.sort(compare);
blog.sort(function(blog1,blog2){return blog2.date-blog1.date;});
26: indexof 找字串 , 找不到則 -1 , return 位置
27:
blog.sort(function(blog1,blog2){return blog2.date-blog1.date;});
round(); //四捨五入成整數
floor(); //浮點數捨去
ceil();//浮點數無條件進位整數
random();//產生0~1隨機數
產生隨機0~5
var num = Math.floor(Math.random()*6);
28
Blog.prototype.toHTML = function(){};
prototype在new class的時候. toHTML只會有一份,並不會因為new多個就有多份.
29:
Blog.prototype.signature = "by Puzzler Ruby";
30:
util.inherits node.js 繼承時使用
Base.prototype.showName 才會被繼承.
31:
util.inspect debug用
32:事件調用
emitter.on emitter.emit
33:
function say_haha(line){
print(this.name,"say haha",line);
}
var haha={name:"jimmy" , speak:say_haha};
haha.speak("oh ~~~ ya");
或者
say_haha.apply(haha,["oh~~~ya"]);
say_haha.call(haha,"oh~~~ya");
browser的寬高
document.body.clientHeight
document.body.clientWidth
2:
<body onload="resizeImg();" onresize="resizeImg();">
3:navigator.cookieEnable. 查詢cookie
4: window.onload = function(){}; 直接在script使用.不用在<body>
5:
<input id="zipcode" name="zipcode" type="text" onclick="showIt(this.form)" />
function showit(theform)
{
alert(theform["zipcode"].value);
}
6:onfocus , onblur , onchange.
onblur跟onchange差別為在切換不同元件即觸發. onchange必須加上數值更動的條件
7:isNanN(inputField.value)
8:
function place(form)
{
form.submit();
}
<intput type="button" value="haha" onlick="place(this.form)">
9:正規表示
. 匹配所有字符,換行符號除外
\d 所有數字
\w 所有數字字母
\s 空格
^ 模式開始
$ 模式結束
/^\d/ 字串開始需要有1各數字
/cat$/ cat作為結尾
/^cat/ cat作為開頭
* 限制符前的子模式0或多次
+ 1或多次
? 0或1次
{n} {min,max} 需出現n次
() 集合字符或/和原字符 , 成為子模式.
var rule=/^\d{5}$/;
if(!rule.test(inputField.value))
/(red | blue) pill/
10:
/d[iu]g/ "dig" "dug" 是ok的
/\$\d[\d\.]*/ "$3.50" "$19.95" 是ok的
11: email 驗證
/^[\w\.-_\+]+@[\w-]+(\.\w{2,3})+$/
12:
getElementByID
getElementByTagName("div")
getElementByTagName("div")[3]
13:
nodeValue nodeType childNodes firstChild lastChild
document.getElementById("haha").nodeValue
document.getElementByTagName("body")[0].childNodes[1].lastChild
var node=document.getElementById("haha");
while(node.firstChild)
node.removeChild(node.firstChild);
node.appendChild(document.createTextNode("Ok,maybe you are alond."));
14:
span div 差異. 都是作為段落的區隔 , 但是div 有換行. div類似大括弧 , span類似大括弧內的小括弧.
15:
<span id="haha1" class="haha">haha</span>
document.getElementById("haha").className
16:
onmouseover: 進入button,
onmouseout: 離開button.
17:
document.getElementById("haha").style.visibility = "visible"; //visible or hidden
18:
<form action=/haha/haha method=POST name="setconfig">
<input type="hidden" name="session_key" id="IDSessionKey" value="123456">
<script>
var sessionKey = <% getCurSessionKey();%>;
document.wlanSetup.elements["session_key"].value=sessionKey;
</script>
</form>
19: 二維陣列
var seats = new Array(new Array(9),new Array(9),new Array(9));
20.
<input type="button" value="Order Banner" onclick="placeOrder(this.form);" />
function placeOrder(form) {
if (validateNonEmpty(form["message"], form["message_help"]) && <---對應form的name
}
21:事件
onforcus , onblur/onchange(移至下一個目標 ,差異為onchange內容被改時觸發)
22:動態修改網頁
var history = document.getElementById("history");
if (curScene != 0) {
// Add the latest decision to the history
var decisionElem = document.createElement("p");
decisionElem.appendChild(document.createTextNode("Decision " + decision + " -> Scene " + curScene + " : " + message));
history.appendChild(decisionElem);
}
23:
var now = new Date();
var between = (time2 - time1)/1000*60*60*24
return Math.round(between) ; #四捨五入
24:
new Blog("Got the new cube I ordered. It's a real pearl.", new Date("08/14/2008")),
function Blog(body, date) {
// Assign the properties
this.body = body;
this.date = date;
}
25: 函數自定義
var num = [2,4,1];
function compare(){
return x-y;
}
num.sort(compare);
blog.sort(function(blog1,blog2){return blog2.date-blog1.date;});
26: indexof 找字串 , 找不到則 -1 , return 位置
27:
blog.sort(function(blog1,blog2){return blog2.date-blog1.date;});
round(); //四捨五入成整數
floor(); //浮點數捨去
ceil();//浮點數無條件進位整數
random();//產生0~1隨機數
產生隨機0~5
var num = Math.floor(Math.random()*6);
28
Blog.prototype.toHTML = function(){};
prototype在new class的時候. toHTML只會有一份,並不會因為new多個就有多份.
29:
Blog.prototype.signature = "by Puzzler Ruby";
30:
util.inherits node.js 繼承時使用
Base.prototype.showName 才會被繼承.
31:
util.inspect debug用
32:事件調用
emitter.on emitter.emit
33:
function say_haha(line){
print(this.name,"say haha",line);
}
var haha={name:"jimmy" , speak:say_haha};
haha.speak("oh ~~~ ya");
或者
say_haha.apply(haha,["oh~~~ya"]);
say_haha.call(haha,"oh~~~ya");
javascript 常用函數
setTimeout("alert('haha');",600); //ms 1次
setInterval("alert('haha');" , 600); //周期
clearInterval(timeId);
setInterval("alert('haha');" , 600); //周期
clearInterval(timeId);
2015年2月11日 星期三
phonegap得到wifi狀態 (phonegap get wifi status)
參考:
http://docs.phonegap.com/en/1.7.0/cordova_connection_connection.md.html#connection.type_full_example
但是在C:\my-app\plugins
phonegap plugin add org.apache.cordova.network-information
不然會沒有反應 , 但是在官方文件沒提到這件事
但是再另一份卻有找到 http://docs.phonegap.com/en/edge/cordova_connection_connection.md.html#Connection
關鍵字 navigator.network 搜尋看看 , 文件目前寫的似乎不夠仔細.
code:https://drive.google.com/file/d/0B8hm-I2M8BD7RlpqbUpwV2NPTjQ/view?usp=sharing
plugin:
1:http://plugins.cordova.io/#/
2:https://github.com/apache?page=2&query=cordova
http://docs.phonegap.com/en/1.7.0/cordova_connection_connection.md.html#connection.type_full_example
function checkConnection() {
    var networkState = navigator.network.connection.type;

    var states = {};
    states[Connection.UNKNOWN]  = 'Unknown connection';
    states[Connection.ETHERNET] = 'Ethernet connection';
    states[Connection.WIFI]     = 'WiFi connection';
    states[Connection.CELL_2G]  = 'Cell 2G connection';
    states[Connection.CELL_3G]  = 'Cell 3G connection';
    states[Connection.CELL_4G]  = 'Cell 4G connection';
    states[Connection.NONE]     = 'No network connection';

    alert('Connection type: ' + states[networkState]);
}

checkConnection();
但是在C:\my-app\plugins
phonegap plugin add org.apache.cordova.network-information
不然會沒有反應 , 但是在官方文件沒提到這件事
但是再另一份卻有找到 http://docs.phonegap.com/en/edge/cordova_connection_connection.md.html#Connection
關鍵字 navigator.network 搜尋看看 , 文件目前寫的似乎不夠仔細.
code:https://drive.google.com/file/d/0B8hm-I2M8BD7RlpqbUpwV2NPTjQ/view?usp=sharing
plugin:
1:http://plugins.cordova.io/#/
2:https://github.com/apache?page=2&query=cordova
url 帶username ,password
http://root:12345@192.168.1.1/test.html
在chrome成功,但是在firefox , ie都失敗
但是在javascript的裡面
httpRequest.open("GET",url,true);
是可以成功的.
在chrome成功,但是在firefox , ie都失敗
但是在javascript的裡面
httpRequest.open("GET",url,true);
是可以成功的.
2015年2月10日 星期二
javasctipt 抓網頁 不固定值
}
loc += '&sessionKey=5654358';
var code = 'location="' + loc + '"';
if("0" != "1")
alert("WARNING: Modem time is not set and Parental Control will not work correctly without it! Please set it in 'Management/Internet Time'");
eval(code);
var str = httpRequest.responseText;
var s1 = str.indexOf("sessionKey=");
var s2 = str.indexOf("'",s1);
var str1 = str.slice(s1 + 11,s2)
alert( "sessionkey:" + str1);
loc += '&sessionKey=5654358';
var code = 'location="' + loc + '"';
if("0" != "1")
alert("WARNING: Modem time is not set and Parental Control will not work correctly without it! Please set it in 'Management/Internet Time'");
eval(code);
var str = httpRequest.responseText;
var s1 = str.indexOf("sessionKey=");
var s2 = str.indexOf("'",s1);
var str1 = str.slice(s1 + 11,s2)
alert( "sessionkey:" + str1);
用html抓html data
如果使用utf8卻有亂碼時,那代表html檔案本身並不是用utf8儲存.
存成utf8格式就好了
code: https://drive.google.com/file/d/0B8hm-I2M8BD7cFBNbFlnM0tSeEE/view?usp=sharing
2015年2月8日 星期日
cgi 溝通
存成add.html 放在/var/www/html/ (此時已經安裝apache2了)
c code 需要編譯 , 根據你的平台而定 , 我用gcc 在linux 編譯為add.cgi名稱 ,並且放置在/var/www/cgi-bin (此時已經安裝apache2了)
有個重點 , 如果在action="/cgi-bin/add.cgi發現有下載的動作 ,這是錯的,因為並沒有經過cgi的處理. 我在fedora ,若是直接點選add.html的話 , 你會發現執行失敗(下載或是File Not Found之類錯誤) 但是如果你使用windows的firefox 打上http://192.168.56.101/add.html 連到fedora的apache2 , 你會發現處理正確. 這是菜鳥的血淚之言阿.
code:
https://drive.google.com/file/d/0B8hm-I2M8BD7cUFmQTNJc3FwQmc/view?usp=sharing


c code 需要編譯 , 根據你的平台而定 , 我用gcc 在linux 編譯為add.cgi名稱 ,並且放置在/var/www/cgi-bin (此時已經安裝apache2了)
#include <stdio.h>
#include <stdlib.h>
int main(void)
{
 char *data;
 long num1,num2;

 printf("Content-type: text/html\n\n");

 printf("<title>加法結果</title>");

 printf("<h3>加法結果</h3 > ");

 data = getenv("QUERY_STRING");

 if(data == NULL)
  printf("<p>無值");
 else if(sscanf(data,"num1=%ld&num2=%ld",&num1,&num2)!=2)
  printf("<p>輸入錯誤");
 else
  printf("<p>和為:%ld。",num1+num2);

 return 0;
}
有個重點 , 如果在action="/cgi-bin/add.cgi發現有下載的動作 ,這是錯的,因為並沒有經過cgi的處理. 我在fedora ,若是直接點選add.html的話 , 你會發現執行失敗(下載或是File Not Found之類錯誤) 但是如果你使用windows的firefox 打上http://192.168.56.101/add.html 連到fedora的apache2 , 你會發現處理正確. 這是菜鳥的血淚之言阿.
code:
https://drive.google.com/file/d/0B8hm-I2M8BD7cUFmQTNJc3FwQmc/view?usp=sharing
2015年2月3日 星期二
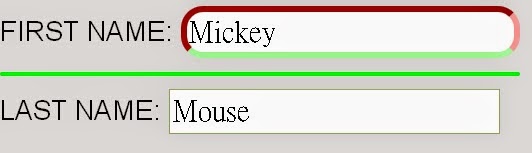
html label 跟checkbox對齊
    .onoffswitch {
    position: relative; width: 90px;
    -webkit-user-select:none; -moz-user-select:none; -ms-user-select: none;
 position: absolute;
 left:200px;
 top:10%;
    }
    .onoffswitch-checkbox {
    display: none;
    }
    .onoffswitch-label {
    display: block; overflow: hidden; cursor: pointer;
    border: 2px solid #999999; border-radius: 20px;
    }
    .onoffswitch-inner {
    display: block; width: 200%; margin-left: -100%;
    -moz-transition: margin 0.3s ease-in 0s; -webkit-transition: margin 0.3s ease-in 0s;
    -o-transition: margin 0.3s ease-in 0s; transition: margin 0.3s ease-in 0s;
    }
    .onoffswitch-inner:before, .onoffswitch-inner:after {
    display: block; float: left; width: 50%; height: 30px; padding: 0; line-height: 30px;
    font-size: 14px; color: white; font-family: Trebuchet, Arial, sans-serif; font-weight: bold;
    -moz-box-sizing: border-box; -webkit-box-sizing: border-box; box-sizing: border-box;
    }
    .onoffswitch-inner:before {
    content: "ON";
    padding-left: 10px;
    background-color: #34A7C1; color: #FFFFFF;
    }
    .onoffswitch-inner:after {
    content: "OFF";
    padding-right: 10px;
    background-color: #EEEEEE; color: #999999;
    text-align: right;
    }
    .onoffswitch-switch {
    display: block; width: 18px; margin: 6px;
    background: #FFFFFF;
    border: 2px solid #999999; border-radius: 20px;
    position: absolute; top: 0; bottom: 0; right: 56px;
    -moz-transition: all 0.3s ease-in 0s; -webkit-transition: all 0.3s ease-in 0s;
    -o-transition: all 0.3s ease-in 0s; transition: all 0.3s ease-in 0s;
    }
    .onoffswitch-checkbox:checked + .onoffswitch-label .onoffswitch-inner {
    margin-left: 0;
    }
    .onoffswitch-checkbox:checked + .onoffswitch-label .onoffswitch-switch {
    right: 0px;
    }
2015年1月31日 星期六
html h1 p 的設定方式
<html>
<head>
<style type="text/css">
h1 {color: red}
p {color: blue}
</style>
</head>
<body>
<h1>header 1</h1>
<p>A paragraph.</p>
</body>
</html>
<head>
<style type="text/css">
h1 {color: red}
p {color: blue}
</style>
</head>
<body>
<h1>header 1</h1>
<p>A paragraph.</p>
</body>
</html>
兩個不同的div 分別設定
<!DOCTYPE html>
<html>
<head>
<style>
div
{
width:100px;
height:75px;
background-color:red;
border:1px solid black;
}
div#div2
{
background-color:white;
transform:rotate(30deg);
-ms-transform:rotate(30deg); /* IE 9 */
-moz-transform:rotate(30deg); /* Firefox */
-webkit-transform:rotate(30deg); /* Safari and Chrome */
-o-transform:rotate(30deg); /* Opera */
}
</style>
</head>
<body>
<div>你好。这是一个 div 元素。</div>
<div id="div2">你好。这是一个 div 元素。</div>
</body>
</html>

<html>
<head>
<style>
div
{
width:100px;
height:75px;
background-color:red;
border:1px solid black;
}
div#div2
{
background-color:white;
transform:rotate(30deg);
-ms-transform:rotate(30deg); /* IE 9 */
-moz-transform:rotate(30deg); /* Firefox */
-webkit-transform:rotate(30deg); /* Safari and Chrome */
-o-transform:rotate(30deg); /* Opera */
}
</style>
</head>
<body>
<div>你好。这是一个 div 元素。</div>
<div id="div2">你好。这是一个 div 元素。</div>
</body>
</html>
2015年1月26日 星期一
html5 編譯成app (android) , Phonegap
Android:
1:安裝nodejs
http://nodejs.org/
2:
1:安裝nodejs
http://nodejs.org/
2:
C:\> npm install -g phonegap3:phonegap create my-app 4:cd my-app 5:phonegap run android (會啟動android模擬器) phonegap build android (不會啟動模擬器 ,apk位置:C:\my-app\platforms\android\ant-build)模擬器安裝 ps:如果需要直接執行模擬器,得另外安裝android sdk , 以及設定環境變數 1:jdkhttp://www.oracle.com/technetwork/java/javase/downloads/jdk8-downloads-2133151.html2: Anthttp://ant.apache.org/bindownload.cgi3:變數 SET ANDROID_HOME=C:\<installation location>\android-sdk-windows
SET PATH=D:\Program Files\ant\ant194\bin;%PATH%修改C:\my-app\www\index.html再重新編譯phonegap build android 還真的能改的動.ios部分也差不多 , phonegap build ios.但跟android 不同的是 , 無法產生ipa檔案安裝 ,必須經過xcode去做產生.但是在xcode的模擬器上. 看來是可以執行的. 查看plugin : phonegap plugin ls安裝plugin : phonegap plugin add org.apache.cordova.network-information
訂閱:
文章 (Atom)